


Wi-Fi is like oxygen for your PC – you only notice it when it’s bad. If you’re on Windows 11 and your connection feels slow, pages take ages to load, or videos keep buffering, don’t panic. The good news is that you can often fix slow Wi-Fi without buying new hardware or paying for a faster plan.
I’ve been there myself – frustrated with laggy connections, especially when working or streaming. Over time, I’ve found some practical tweaks that really make a difference. Here’s a list of 10 proven ways to speed up Wi-Fi on Windows 11, based on real experience.
Why Is Your Wi-Fi is Slow and how to Increase Wi-Fi Speed on Windows 11?
Before we start, let’s look at the usual suspects:
- Too many apps running in the background and eating up bandwidth.
- Outdated network drivers.
- Power-saving settings limiting your Wi-Fi card’s performance.
- Bad router placement or interference from other devices.
- Using the wrong DNS servers.
Sound familiar? Let’s fix it.
1. Restart Your Router and PC
Yes, it sounds basic – but trust me, it often works. Routers need a reset from time to time.
✅ What to do:
- Turn off your router for 30–60 seconds, then restart.
- Restart your Windows 11 PC to clear any temporary issues.
Tip: Place your router in an open spot, away from walls and electronics. It matters.
2. Kill Background Apps That Use Bandwidth
Windows loves running apps in the background. Some of them quietly consume your internet.
✅ Quick fix:
- Press Ctrl + Shift + Esc to open Task Manager.
- Sort by Network and close apps that don’t need to be online (like cloud sync, game launchers, etc.).
My advice: Turn off auto-sync apps like OneDrive if you don’t use them often. It’s a quick speed boost.
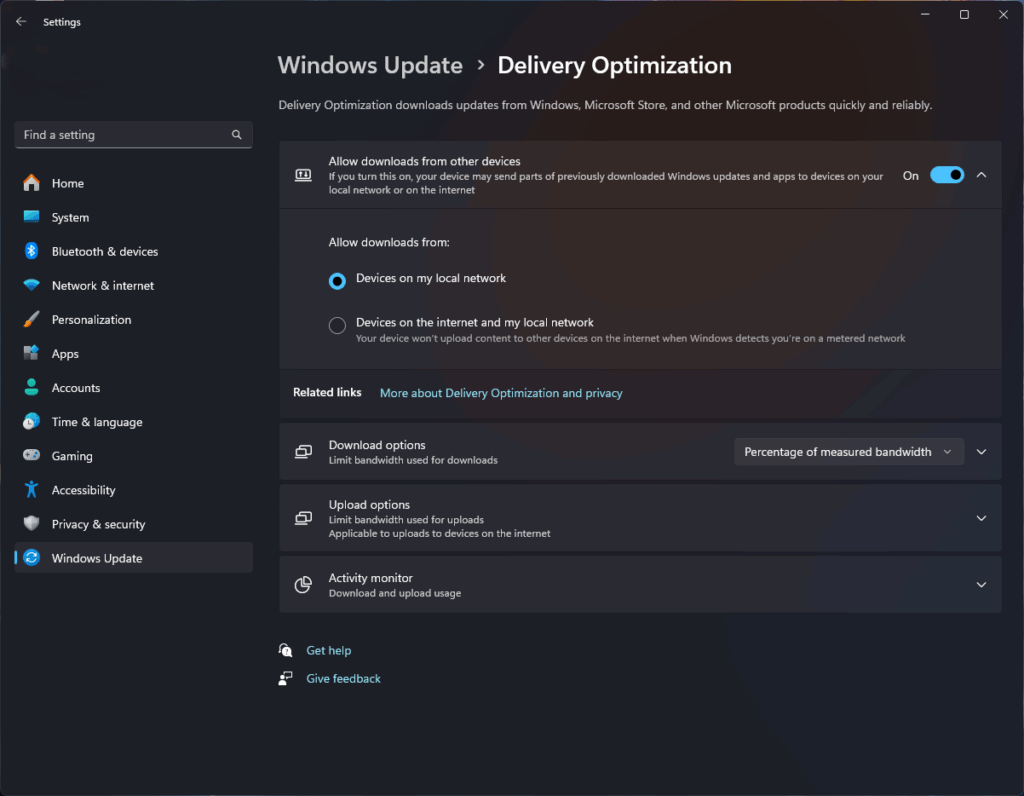
3. Disable Delivery Optimization
This feature uses your bandwidth to send Windows updates to other PCs. Great for Microsoft, not for you.
✅ How to disable:
- Go to Settings → Windows Update → Advanced Options → Delivery Optimization.
- Switch it OFF.
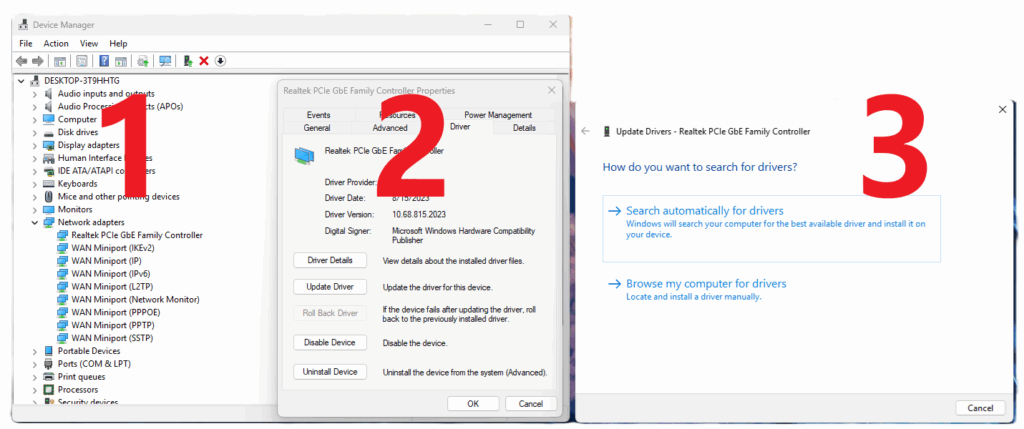
4. Update Your Wi-Fi Drivers
Old drivers = poor performance.
✅ Update steps:
- Right-click Start → Device Manager → Network adapters.
- Find your Wi-Fi card → Update driver → Search automatically.
5. Change DNS for Faster Browsing
Your ISP’s DNS isn’t always the fastest. Try Google or Cloudflare.
✅ Set it manually:
- Settings → Network & Internet → Wi-Fi → Hardware Properties.
- Use 8.8.8.8 and 8.8.4.4 (Google) or 1.1.1.1 and 1.0.0.1 (Cloudflare).
6. Stop Power Saving on Your Network Card
Windows sometimes slows your Wi-Fi to save battery.
✅ Turn it off:
- Device Manager → Network adapters → Your Wi-Fi card → Properties → Power Management.
- Uncheck Allow the computer to turn off this device to save power.
7. Forget Old Wi-Fi Networks
Clean up your list of saved networks to avoid connection conflicts.
✅ Do this:
- Settings → Network & Internet → Wi-Fi → Manage known networks → Forget unused ones.
8. Switch to 5 GHz (If Available)
If your router supports 5 GHz, use it. It’s faster than 2.4 GHz.
✅ How:
- In Device Manager → Network adapters → Advanced, set Preferred Band to 5 GHz.
9. Pick a Better Wi-Fi Channel
Crowded channels slow your speed. Use your router’s settings or a tool like Wi-Fi Analyzer to find the best channel.
10. Hardware Upgrade (If All Else Fails)
If your PC has an old Wi-Fi card (802.11n), upgrade to Wi-Fi 6 (802.11ax). It’s a game-changer for speed and stability.
Final Thoughts
Most slow Wi-Fi issues on Windows 11 come from small settings, not big problems. Start with the easy fixes:
Disable background apps on Windows 11
Update drivers
Change DNS
Turn off Delivery Optimization
I use these tweaks myself, and they always make a difference. Try them and see for yourself.


0 Comments